
How I Built My Blog with Astro and Made It Open Source
I didn’t know what Astro was.
Today, this blog you’re reading runs on it, and powered by a free theme.
Here’s the story of how I went from “I just want to test this” to “here’s my first open-source project”.
Why I Chose Astro (For Perfect Lighthouse Scores)
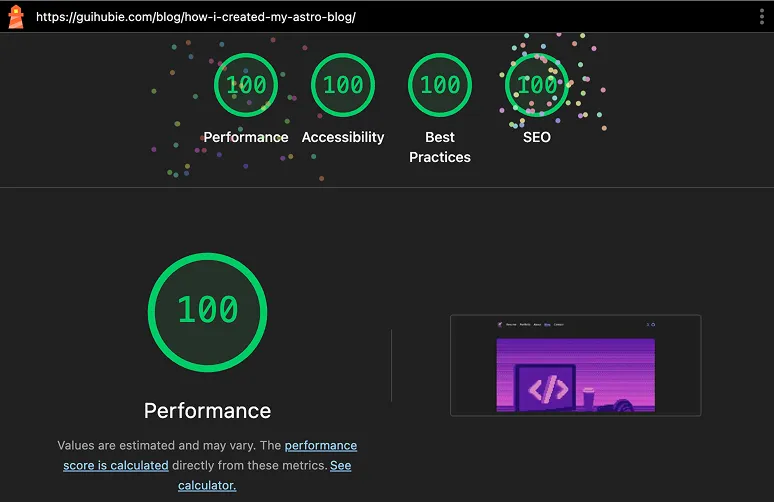
I was searching for a good and free Astro template. Almost all of them had something in common: perfect Lighthouse scores — 100/100 for performance, accessibility, SEO, and best practices.
So I had to see for myself. I runned the starter template just to test it… and before I knew it, I was customizing it and turning into my personal blog portfolio.
Astro makes those scores realistic because of how it’s built:
- Ships minimal JavaScript by default (only loads what’s needed)
- Uses static site generation for speed
- Optimizes assets automatically
Coming from non-technical website builders like WordPress, my first impression was:
- Speed: Pages loaded instantly
- Simplicity: Posts are just Markdown files
- Control: You can customize everything without fighting a bloated theme
- Free: No need to purchase plugins or pay subscriptions
First Time Coding & Deploying Anything
I’d never built and deployed a site from scratch before. This was my crash course in both.
I learned Astro by actually building. It was uncomfortable at first, but within a few days I had a functioning site.
Barely Knew Git (And Survived)
Before this, my Git knowledge was basically:
git add .
git commit -m "update"
git push
That’s it. And honestly?
That was enough to get my first deployment live.
The Tech Stack Behind This Blog
- Astro – Static site generation for speed + SEO
- Tailwind CSS / Starwind UI – Utility-first styling without drowning in CSS files
- Markdown – Each blog post is a simple .md file, making writing frictionless
This stack is simple, modern, and lightweight. Perfect for a portfolio blog without unnecessary complexity.
Deployment with Netlify
I went with Netlify over Vercel for one reason: I wanted to test how smooth their “zero-config” approach really was. And: it worked perfectly.
- Here’s how it went, step-by-step:
- Pushed my Astro project to GitHub
- Logged into Netlify and clicked “New Site from Git”
- Connected my GitHub repo
- Netlify detected Astro and pre-filled the build settings
- Hit Deploy — and 30 seconds later, my blog was live
Free tier perks I love:
- Global CDN for fast load times
- Automatic SSL certificates
- Continuous deployment (push to main = live update)
- Zero server management
How You Can Use This Template
- You can check the demo site
Launch your own version of this Astro blog in under 15 minutes.
1. Clone the repo
git clone [https://github.com/guihubie/free-astro-template]
cd free-astro-template
2. Install dependencies
npm install3. Run it locally
npm run dev4. Start customizing
- Edit the src/content
- Update colors, fonts, and images in the Tailwind config
- Change site metadata in astro.config.mjs
5. Deploy
That easy!
Final Thoughts
Just ship it.
Want to see how this blog performs? Check out my guide on achieving perfect Lighthouse scores and SEO strategies for 2026. The technical foundation matters for growth.